Deployment on Azure Container Registry & Azure Kubernetes Service
In the previous post, we wrapped out ML Model inside a Flask Web Service which we could access through GET and POST Requests. Once, we found the application running perfectly on out local system, we containerised the application and pushed it to docker hub.
Today, we’re going to take it up a notch further and will deploy the service on Azure Cloud Service. We can perform the task in two ways:
-
Running out application as a Container Instance in Azure Container Registry(ACR)
-
Deploying the Application on Azure Kubernetes Service(AKS)
At first, we will create a resource group and will then create an Azure Container Registry within that resource group. Every Azure Service that we are going to create will be inside our Resource Group. We have named our resource group as trial-rg. The name of the Azure Container Registry is breastcancersd.
Running the Application as a Container Instance in Azure Container Registry(ACR)
We will be using Azure CLI for running the commands.
#Create A Resource Group
az group create --name trial-rg --location centralindia

#Get Subscription
az account show --output table

#Create ACR
az acr create  --resource-group trial-rg  --name breastcancersd --sku Basic
Once we have completed completed the above steps, we should check whether the resources have been created properly in the Azure Portal. Next, we will login to the Container registry, tag the local docker image to that of the container Registry, and then push it to the container registry.
#Login to ACR
az acr login -n breastcancersd

#Tag a Docker Image to ACR
docker tag breast_cancer:latest breastcancersd.azurecr.io/breast_cancer:v1.0

#Push the image to ACR
docker push breastcancersd.azurecr.io/breast_cancer:v1.0
Once done, we should verify that the image is present in the Container Registry. Next, we
#Enable Admin Credentials on the ACR
az acr update -n breastcancersd --admin-enabled true

#Run the Azure Container Instance
az container create --resource-group trial-rg --name breast-cancer --image breastcancersd.azurecr.io/breast_cancer:latest --cpu 1 --memory 1 --registry-login-server breastcancersd.azurecr.io --registry-username breastcancersd --registry-password <acr_password> --dns-name-label breastcancerapp --ports 12345

az container show --resource-group trial-rg --name breast-cancer --query instanceView.state

az container show --resource-group trial-rg --name breast-cancer --query ipAddress.fqdn

#View Logs
az container logs --resource-group trial-rg --name breast-cancer
Once the container instance is running, we can run the below access the service below
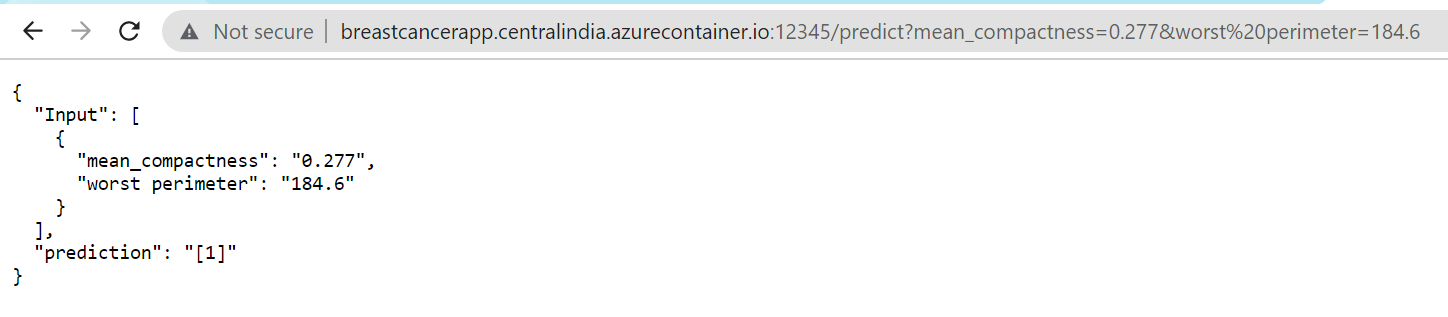
Hence we have deployed and run the application as a Container Instance on Azure Container Registry. Once, the application have been tested, make sure to run the below command to delete the resource group to prevent Recurring Charges.
az group delete --name trial-rg
Deploying the Application on Azure Kubernetes Service(AKS)
In this process, we will be following the same steps from creating a resource group till pushing the docker image on ACR, but after than, we will need to create a Deployment File, that will Deploy the Application on a Kubernetes Cluster.
The basic, initial steps will be:
#Create a Resource Group
az group create --name trial-rg --location centralindia

#Get Subscription
az account show --output table

#Create ACR
az acr create  --resource-group trial-rg  --name breastcancersd --sku Basic

#Login to ACR
az acr login -n breastcancersd

#Tag a Docker Image to ACR
docker tag breast_cancer:latest breastcancersd.azurecr.io/breast_cancer:v1.0

#Push the image to ACR
docker push breastcancersd.azurecr.io/breast_cancer:v1.0
Next, we should create an AKS cluster and and connect the ACR with the AKS and the cluster with kubectl.
#Create AKS
az aks create --resource-group trial-rg --name breast-cancer-cluster --node-count 1 --enable-addons monitoring --generate-ssh-keys

#Connect the AKS with ACR
az aks update -n breast-cancer-cluster -g trial-rg --attach-acr breastcancersd

#Connect to cluster using kubectl.
az aks get-credentials --resource-group trial-rg --name breast-cancer-cluster
Next, we need to deploy our application. Hence, we will need to create a Deployment YAML File.
apiVersion: apps/v1
kind: Deployment
metadata:
  name: breast-cancer-api
  labels:
    app: breast-cancer-model-api
spec:
  replicas: 5
  selector:
    matchLabels:
      app: breast-cancer
  template:
    metadata:
      labels:
        app: breast-cancer
    spec:
      containers:
      - name: breast-cancer
        image: breastcancersd.azurecr.io/breast_cancer:v1.0
---
apiVersion: v1
kind: Service
metadata:
  name: breast-cancer-entrypoint
  namespace: default
spec:
  type: LoadBalancer
  selector:
    app: breast-cancer
  ports:
  - port: 12345
    targetPort: 12345
We should use the vi editor to create the file and name it as breast-cancer-deploy.yaml.Once done, save and exit from the vi editor.
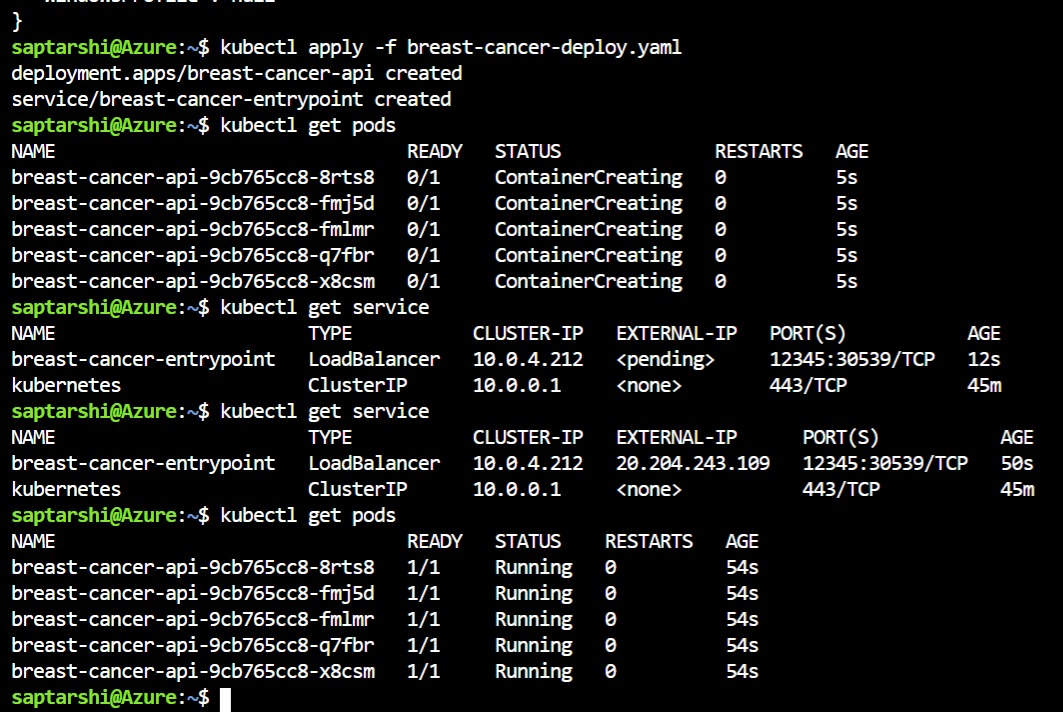
Next, we need to deploy to deploy the application on the kubernetes server using the below commands:
kubectl apply -f breast-cancer-deploy.yaml
#Run this command to check the pods
kubectl get pods
#Run this command to check the service
kubectl get service
Below are the outputs for the commands:
The application can be accessed at:
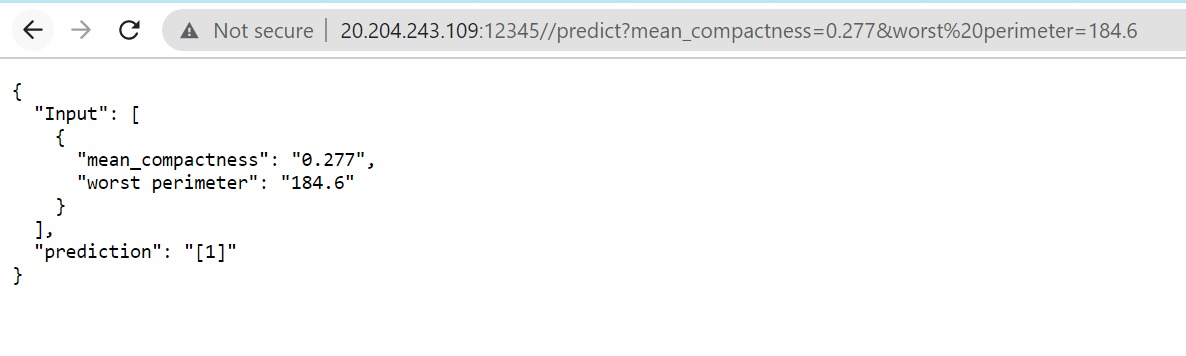
This brings us towards the end of this blog, where we have shown how to run the application on Azure Service.